"The greatest fine art of the future will be the making of a comfortable living from a small piece of land."
-Abraham Lincoln

Bookmarks

As a follow up to my previous blog entry I thought I would share some project ideas that can utilize our new found laminating talents (whether they be of the laminating machine, self sealing, or warm iron variety).

The first project idea?  Bookmarks!
I LOVE to read.  I devour books as often as I can and I've found that my kids are becoming little bookworms themselves.
Unfortunately, as a result of rigorous over-use, every book mark that ends up in this house is crumpled, ripped and destroyed in a mere matter of days.

I think you can see where I'm going with this...
we needed a way to protect our bookmarks so that we didn't end up having to resort to using string, pieces of paper, old bandaids (j/k about that last one), or whatever is laying around the house to keep our page.
Enter, LAMINATION!!!

Plus, it's a great way to personalize them.

I decided to whip up a quick photoshop image using royalty free and common use images and vintage ephemera...


I also found a whole host of pre-made bookmarks for microsoft office here that are available for download and I printed off some of those as well.


It's best to use cardstock for this project.
It adds even more stability to the bookmarks.


I proceeded to laminate in the same manner as I described in the last post and...


The finished product.
Now we have nice, personalized, and sturdy bookmarks.


Case closed ;)

Thrifty Thursday

I finished my 7x9 granny "rectangle" for Warm Up America.  

I used the rectangle granny square pattern found at crochet cabana.
For me, 8 rounds worked up to the exact dimensions I needed (7in x9in).
Easy Peasy Lemon Squeezy.


Onto the Thrifty Thursday money saving tip(s)...

I worked up a couple of really cute little chore charts for my oldest two kids.  I tailored made them for each of my kids according to their ages, reading skill level, etc.  I wanted them to be able to cross off each chore as they went through the day but having to print out multiple chore charts for the week or month seemed tedious and rather expensive in terms of paper and ink, not too mention wasteful.  The answer: laminating.   I could laminate a chore chart for each kid and hang it up in their room.  That way, they could use a washable marker or crayon and cross off each chore as they went through the day and the next morning we could wipe it clean and start all over again.  That's tip one.  Laminate your kids chore charts, or a template for your shopping list, or even a simple weekly planner.

With that idea in mind, I loaded up each of my little moppets and headed over to the local office supply store.  The laminators there ranged in price from $700 to $40.  I headed over to the local Walmart.   There the only choice of laminator cost $37.   I looked at the sheets of laminating paper.  The self sealing (no laminator needed) cost $10 for 20 sheets.   The ones that were meant to go through the laminator cost half that at around $5 for 20 sheets.  Now on to tip 2.
I didn't like the idea of paying nearly $40 for a laminator for simple home projects.  I really didn't like the idea of paying double for self sealing laminating sheets.  So, I came up with this thrifty little compromise.


I bought the sheets for the machine and decided to utilize my iron in lieu of the laminating press.
If you want to try this at home there are a couple of supplies that you will need.
1. An iron that has a low setting.
2. Thermal laminating sheets.
3. Tissue paper or light cloth to protect your iron.
4. Something to laminate (in this case I used an example of Middle's beautiful artwork monster)


Place your item into the laminating pouch like so...


Cover with the tissue paper.


For my iron I used the acetate/nylon setting.
If your iron doesn't have that option then just use the lowest setting if it gets too hot you'll have bumps and bunches and melted spots.


Press firmly as you iron.  I like to work from the top down and sweep out from the center as I go.
Make sure to get your corners and edges.
After about 10 seconds of work you have a nicely laminated product for a fraction of the cost.

Cookie's Story


Meet Cookie.
She's appeared on this blog before so I figure that it's about time to formally introduce her.
Cookie is a rescue mini dachshund.  She came from a puppy mill that was operating about 2 miles down the road from me.
The owner of the puppy mill had found out that he was about to be raided.
So he started to "unload" the evidence.
He began to dump dogs and puppies.
He dumped 4 at a neighbor's house and he dumped 5 in our yard.
With all the dogs that he dumped, animal control still found a whopping
60 (SIXTY!) dogs and puppies.  Turns out he couldn't unload all of them fast enough, he was still, thankfully, caught.

Of the 5 dumped at our house,
there was only 1 dachshund.  There were two chihuahuas, 1 lhasa apso, and 1 westie.
We fell in love with the dachshund immediately.  We already had a dachshund, Chandler (you can see his picture below), so we were familiar with the breed. It just seemed to fit.

Unfortunately, we couldn't keep all 5, and the two chi's were close to death as it was. 
We knew they needed more care than we could provide. We turned the other 4 over to the SPCA, they were the ones who were spearheading the investigation.
From what I've heard, 1 of the chi's passed away before the end of the night.  The other had to be put down. But, the westie and the lhasa apso were able to be treated and found good homes.

We named our new family member, Cookie, because she was so sweet and we got her over to our vet immediately.
She was treated for dehydration, they estimated her age at about 5 years, and found she was pregnant.
She was, apparently, one of his "breeding stock".
We began her treatment for worms around what we guessed, based on ultrasound, was her 40th day of pregnancy, as recommended by our vet.
Fortunately, considering what she went through and where she came from, she was fairly healthy.
Now, I don't have anything wrong with dog breeders.  But there is a right way to breed dogs and a wrong way.  What he was doing was definately the WRONG way.

ANYWAYS, that was back in November.
As of right now we are getting very close to end of her pregnancy.
As you can sort of see here:


I'm nervous and excited.
I've never been involved in the dog whelping process before.
Oh, I'm not new to the birthing process.
I've had three kids of my own, been around for the birth of calves, horses, goats etc.
But I've never been involved in the dog breeding realm of things.

I've got the vet's number posted on my fridge.
The number of a REPUTABLE and experienced dachshund breeder right next to the vet's number.
I've read books and articles online.
We've got the whelping box.
I've got the emergency puppy feeding kit.
We're ready.
Bring it on mother nature!


This would be Chandler.
Isn't he cute?

New Year's Resolutions

Every year I seem to follow the trend of making New Year's resolutions that benefit the outside of my body i.e. lose 10lbs, exercise more, eat healthier, etc.  But this year, I've decided to make a few resolutions that will hopefully benefit the "inner me".  
This year I resolve to:
1. Go at a little slower pace.  Stop piling on project after project after project.
2. Really stop to smell the roses.
3. Occasionally do things that I really enjoy just for the heck of it.
4. Be more spontaneous.


Baby it's COOOLD outside

It's seriously frigid out here today.   It got up to a whopping 4 degrees with a nice windchill of -10.   Needless to say it made my outdoor chores more than a little unpleasant.  

But, the chores are finished now.  The chickens are fed, the cows are fed, the horse is fed and I'm finally at home ready to sit down to a nice cozy cup of cocoa.   It seems like a good day today to once again tackle the "afghan from hell".

Also, I'm working on some more squares for Warm Up America.  So I'll hopefully be posting some of those up here soon as well. 

The Year in Review

It's time to say goodbye to 2009.  It was a whirlwind year not only for the nation as a whole but for my little family as well.   We experienced new adventures like starting the first day of school, losing our first teeth, potty training, chasing cows, and making self sufficient strides.   We had some sad times. We had some hard times.  We had a lot of happy times. 
Let's take a look at some of the many highlights of this year in pictures...

This year:


We welcomed new arrivals.


We enjoyed lazy summer days.


We reaped the fruits of our labors.


We said goodbye to our two front teeth.


We created.


We tried new things.


We celebrated.


We had fun.
Goodbye 2009


My First Attempt at Knitting in the Round


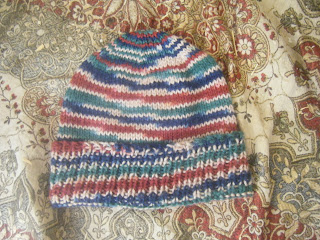
This was my very first attempt at knitting in the round.

As I've mentioned on here before, I'm new to the knitting scene.
Since I've taken up this new passion about 4 months ago, I've knitted one hat for oldest, one for youngest (that didn't fit) and now this one for me, myself and I.
I still have to knock out one for middle.  I have my eye set on one that I think will be really cute for him but I wanted to try knitting a larger one in the round first.  I figured that it would be easier to go larger.  I don't remember the logic behind that thinking at the moment...


It fits pretty nicely and definately keeps my head toasty warm.
It took about 3 days and that's with almost constant interruption (as in...sit down, knit 5, "MOM!", get back up, sit down, knit 6 ,"MOMMY!", you get the idea)


*Thank you to Fremont Frog for modeling for me, I'm a wee bit camera shy*

Aside from a rocky start (I could NOT for the life of me figure out how to eliminate that giant gap in between the first and last stitches when I joined the round.  SO, I googled it.  There's almost no problem google can't solve.  Turns out, you just pull the the first knit stitch you make when joining the round extra tightly.  Who knew?) I think it went pretty smoothly. 
I used leftover worsted weight variegated yarn.
A size 8 16in. circular needle
4 size 7 DPNs.
1 tapestry needle
stitch marker

The hat is done in a basic pattern.
Using the circular needle, cast on 70.
K1 P1 for about 2 inches.
Then knit in stockinette (knit each stitch) for about 6 inches.
K8 K2tog for 1 row
Knit the next row
(You'll want to switch to the DPNs about now)
K7 K2tog for 1 row
Knit the next row
K6 K2tog for the next row
Keep going like that until you K2tog across the row and/or you have about 6 sts remaining.
Cut thread leaving about a 4 inch tail.
Thread tail through tapestry needle and then carefully weave through remaining sts, pull tightly.
Weave in your ends, making sure to finish with a little bit of your tail left over on the wrong side of you hat.
And that's it. FIN.