"The greatest fine art of the future will be the making of a comfortable living from a small piece of land."
-Abraham Lincoln
Showing posts with label Thrifty Thursday. Show all posts

Thrifty Thursday (on Friday again)

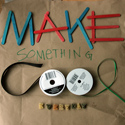
Do you like to knit?   Do you hate spending all that money on knitting needles?   Well, now you can make your own.  

I made a few size 6 bamboo knitting needles out of 12 in. bamboo skewers and a few beads.   The skewers cost me $1.99 for 100 of them.  The beads I had on hand, but you could pick up a bag of beads for about $2.99.  One set of 12 in. bamboo knitting needles would cost you anywhere from $5.75 to $8 or $9.   Custom knitting needles can cost you anywhere from $10 to $20. 

The only other thing you need is fine grit sandpaper to smooth out the points and some of the rough spots on the bamboo.  


The first step is to pick out to skewers that are nice and straight and are the same length. 

Next, smooth out the points and the rough edges with your sandpaper.

Then pick out two beads that have a wide enough hole to fit at the end of the skewer.  If it's a tight fit you can get away with just twisting the beads on, but if there is a bit more room then clue the beads on with craft clue or E600.


Wait for your glue to dry and then, tada!  you have custom knitting needles!


If you want different sizes or different types of wood then you can always use wooden dowels.   You would just need to create a point using a standard run of the mill pencil sharpener.  You can customize them further with paints or wood stain just make sure to pick a paint or a stain that isn't going to come off onto your hands or your project.


Well Hello There.


Meet Mr. Cicada...

Or...at least what's left of him.   I haven't heard the incessant buzzing sound of an impending cicada infestation this year so you can imagine my surprise when I walked outside to see this juvenile cicada exoskeleton on my back deck.   Later that afternoon I inadvertantly squashed a teneral (ie. teenaged) cicada on my floor.  That unfortunate fellow could very well have been the same one that left it's skin outside my door and scared the bejeebus out of my kids (the looks on their faces when they saw this were priceless.)
The last outbreak of cicadas here was in 2007 and I had these exoskeletons all over every tree in my yard, every tree in the orchard, and several on my house, barn and shed.   It doesn't seem as though we should be due for another outbreak like that for awhile, methinks these guys will be out in very limited numbers this time around.


Now, for a Thrifty Thursday (yes, I know it's actually Wednesday but I try not to get bogged down by technicalities) update.
If you have hard floors anywhere in your house then you probably own a Swiffer or some kind of Swiffer equivalent.   If you don't, you should, they are handy little things to have around.   Of course, if you have one of these then you probably also realize that buying the replacement pads can start to get a bit expensive.  I bought a 12 pack for $4 on sale yesterday and while that sounds like a lot they don't last as long as I would like.   The answer:  Make your own Swiffer cover!  
I made this one for my Swiffer Wetjet and it works for dry dusting and wet mopping.  

It's made out of a small amount of 100% cotton yarn ($1.97 on sale).  One small skein will give you about three replaceable covers. 

I crocheted this in half double crochet (hdc), back loop only to produce nice dust catching ridges.   You can check out the pattern here.


The little straps hold the pad onto the mop and are stretchy enough to allow for easy removal.

So when you are done and your cover is dirty, instead of throwing it and your moeny away, you pop it into the laundry and then reuse it.

Thrifty Thursday

Thrifty Thursday tip of the day:
Make your own laundry detergent.    A super-smart lady over on another site clued me into a few recipes for homemade high efficiency laundry detergent.   I'm sure that many of you out there who have HE washers (like yours truly) have realized just how much more expensive the HE laundry detergent is compared to regular detergent.   Making your own can help to really put a dent in those costs.

Here's a copy of the messages she sent me with the recipes:

Original Recipe -


1/3 Bar Fels Naptha

1/2 C. Washing Soda

1/2 C. Borax Powder


Grate soap and put it in a Saucepan.

Add 6 C. water and heat until soap melts.

Add the washing soda and Borax then stir until dissolved.

Remove from heat.

Pour 4 C. hot water into the bucket.

Add your soap mixture and stir.

Add 1 gal. and 6 C. of water and stir.

Let the soap sit for 24 hours for it to gel.

Use 1/2 C. per load


*Super-smart lady's* FRIEND’S Modifications -

1 whole bar of Zote

1 C. Washing Soda

1 C. Borax Powder

5 gal. bucket


Grate Soap and put in a big saucepan.

Mix washing soda and Borax Powder in a bowl (dry).

Put 12 C. of hot water in with Zote until soap melts.

While soap is melting, put 8 C. of water in microwave to boil (about 3 - 4 min).

When the soap melts, add the powder mixture.

Stir until all is dissolved.

Pour soap mixture into the bucket.

Pour water from microwave in bucket and stir.

Fill up rest of bucket with hot tap water until it is full & stir some more.

Put lid on bucket and let sit for 24 hours.

Stir before use. (mixutre is like “egg drop soup”)

Use 1/2 - 1 cup


MY *super-smart lady's (Jeannie)*  Mods -

Ingredients -

1 bar Zote soap - grated

1 ½ cups Borax

1 ½ cups Washing soda

5 gallon bucket

12 cups water - tap - (no need to microwave)

8 cups water - hot (from tap)

Grate soap and put in a sauce pan.
Add 12 cups tap water & heat on medium until soap melts.
Add washing soda & borax, and stir until dissolved.
Remove from heat.
Pour 8 cups hot water into a 5 gallon bucket.
Add soap mixture to bucket and stir.
Let soap sit for about 24 hours to gel.
This will yield a mixture that is a thicker than “egg drop soup”.
Use ½ - 1 cup per each load.
Note - You can use Zote soap, Fels Naptha, Ivory, or whatever soap you want. I like Zote, and so does my friend. I am going to try using Ivory on my next batch so I can compare.

Have fun! -

End Transmission :D

PS.  WASHING soda is not to be confused with baking soda.  

Thrifty Thursday (err, on Friday)

I remember one summer when my grandmother had decided to have her house painted.  She ended up spending about $1000 (back in the mid 1990's) to have the outside and inside of her very small, 800sf. home painted by professionals.  
We had a neighborhood painting company come by our house last year and estimated our single story home at $3000.   

So here's my Thrifty Thursday tip for this week.  DIY (do it yourself) and save hundreds to thousands of dollars.
Here's my list of common things that you can do yourself with nothing but your own two hands, a few tools, and in some cases a trip to the local library.  

1.  Paint your own house.    Yes it does take some time, but probably not as much as you may think, especially if you get a little help from your friends.   We were able to paint our entire living room, foyer, hall and dining area for around $150.  We painted the outside of the house, the enclosed porch and the bedrooms for about the same.   Ending with a total bill of about $300.   Compare that to $3000 and that's a savings of $2700.   Easily worth the two weekends (in which we took our sweet time mind you) of painting. 
2. Install your own faucets.   This usually doesn't require anything but a few tools, some plumbers putty and the instructions that came with the faucet.  If your faucet didn't come with instruction you can easily find how to install a variety of different faucets online or in plumbing books at the library. 
3. Install your own ceramic tile backsplash.   Depending on the type of tile you choose you may need a wet tile saw.   Otherwise, all you'll need is some tile grout, the tiles themselves, a free evening, spacers, a notched trowel, and, depending on your tile choice, maybe a sealer (in most cases a sealer isn't necessary but check with the knowledgable folks at your local homestore. 
4. Fix your own toilet.   Here's a common one.   Your toilet is running (better catch it ...ah, nevermind, that jokes just tired) and it won't stop.   You reach for your phone book, better call the plumber....stop yourself there.   This is one of the easiest fixes in my opinion.   You simply need to replace a faulty flapper or ball assembly (those little do hickeys in the back of the toilet, one looks like a giant ball, the other looks like a plug attached to a chain).    Worst case scenario you'll need to clean some mineral deposits out of your toilet tank itself.  In which case you can use some vinegar, boiling water and baking soda and poof!  Done.  
5.  Fix your own banging pipes.  This one seems more ominous to home owners than it frequently is.   There SHOULD be anchor straps on your pipes every 8 feet or so, 6-8ft for horizontal pipes, and 8-10ft for vertical pipes.   If your pipes are banging, its usually because the are loose and all you then need to do is add a few more anchor straps.  Cushion the pipes from the anchor with a little bit of rubber blanket.

There you have it guys.  Your thrifty tips for this week.  

Thrifty Thursday

10 Tips for Saving Cash:


Some people who know me will tell you that I can "pinch a penny so tight, I squeeze the boogers out of Lincoln's nose."   
Now, I'm not cheap but I am frugal (yes, I firmly believe there is a difference).  I like to pinch pennies in many areas of my life so that I have enough money to indulge in other areas.  Frugality is also important when you have to save for things like your children's college education.  
So, for all you other frugal folks out there (or those who aspire to pinch Lincoln's head a little tighter), I give you...drumroll please....10 tips for saving money.

Tip #1: This may seem obvious but you would be surprised how many people miss this one, ditch the brand name items for store brand especially in the case of groceries.   The idea that store brand is not as high quality as name brand is absolutely not true, at least in the vast majority of cases.   Most of the time the store brand options are made from the same manufacturers and with the same or comparable ingredients as the brand name items.  In fact, in all my years of buying store brand I've only found two store brand items that flunked the taste test against the national brands.   The first was Kroger's alternative to Captain Crunch.  That stuff was truly awful.   The second was the early Meijer's version of Manwhich, and that problem appears to be resolved.   And the savings is definately significant.  For example, we bought a bag of store brand "Cocoa Puffs" for $1.50.    A box of national brand Cocoa Puffs cost double that and with less cereal in the box to boot.
You haven to be careful though, I have run into a couple of occasions where the store brand cost more than the national brand so always compare prices and check sales.  

Tip #2: Brown bag it.   Whether you are going to work or going on vacation you can save a lot of money by packing as many of your meals and snacks as possible.   That way you can cut down on your trips to restuarants and fast food joints.

Tip #3: Use a cash back credit card and resist the urge to carry a balance.   I use our cash back credit card routinely for gas.   As a result I get a 5% refund everytime I fill up.

Tip #4: If you don't have your cell phone surgically attached to your ear, try switching to a pay as you go plan. If you only use your phone sporadically then you probably don't need that $80 a month unlimited plan.  You could easily save $30 a month this way or more depending on how much you talk.

Tip #5:  Looking to redecorate?  Start with items you already own.   Pull some of that furniture out of the attic.  Spruce it up a bit.    Add some new touches.   You'll save hundreds of dollars by reusing your old items.  

Tip #6: Think big when it comes to cooking.   Buy your meat in the more economically priced "family sizes" or you can find a local butcher or farm that will sell meat in bulk sizes by the cow.  Then, double your recipes when cooking at home and freeze whatever is left.  You'll pay less per pound for the meat and you'll have a meal for hectic days when you would otherwise go out or order in.  

Tip #7: Get free firewood.   Call around to your local tree service companies.  Many times they will let you come to the cleanup site and take the smaller limbs and branches.   Also check your local landfills or city run yard cleanup sites for free or very inexpensive mulch.  

Tip #8: Postpone your purchases.   You know that item you see on the shelf while your out shopping...that one you didn't plan on getting but it just seems to be begging you to take it home...well don't.  Wait.   Postpone purchasing the item for a week or until your next shopping trip.  Chances are you'll have forgotten all about it by the time the week rounds to a close and if you find that you're still longing for it after a week has passed then it's probably something you actually can use.  

Tip #9: DIY (aka. do it yourself).   You don't need to hire a professional for most of the smaller projects that need done around your house.   Have a leaky faucet?  Head to the library to get a few books on how to fix the problem.   Want a new color paint on your walls?   Head over to lowes or home depot for a brush and some free tips from their knowledgeable associates.    There are a wide array of projects that are easy enough to do yourself with a little research and that can save you hundreds, sometimes even thousands of dollars.

Tip #10: This is an important one for all parents out there.   Just say no.    It's easier than it seems.  N-O.   When your kids say they will just "die" without the latest video game system or the newest $50 doll (complete with pooping mechanisms) give a nice, simple, firm "no".   Trust me, your kids do not need all the latest toys.  The will live without that $300 power wheels car.   Their heads will not really explode if they don't get a trinket everytime you stop at the grocery store.   Save your toy purchases for Christmas and birthdays and for those occasions utilize the clearance rack, second hand stores and craigslist/freecycle as much as possible.   You can get your kids some nice stuff without completely blowing your budget.  


Nowgo out into the world a more confident, wiser, stronger, and more frugal person.

Thrifty Thursday

I met a woman in the grocery store the other day who was complaining about the high cost of general household cleaners.  Store bought cleaners generally cost anywhere from $2.20 upwards to $5.00.    Most of these cleaners can be made at home for much cheaper and with less toxicity.

There are a few base ingredients that you will need if you intend to make your own household cleaners.
1. Plain white vinegar.
2. Baking soda
3. Rubbing Alcohol
4. Borax
5. mild dish detergent

This recipe for an all purpose cleaner is one that you can mix up right in the spray bottle.  It's easy and economical.
All Purpose Spray Cleaner:
1 tblsp. vinegar
1 tblsp. borax
Hot water
a few drops of dish detergent
essential oils *optional*
Makes 16oz.

In your spray bottle combine the vinegar and borax.  Fill the bottle about half full with the hot water and swish or stir until the borax is dissolved.  Add the dish detergent and fill the rest of the bottle with more hot water.   Add essential oils if you'd like.

Soft Scrub recipe:
This one simply requires a small amount of baking soda (enough to get the job done).  Add liquid dish detergent to the baking soda until it forms a paste-like consistency. 
It's great for use on sinks and counters.

Glass Cleaner:
1 cup rubbing alcohol
1 cup water
1 tblsp. white vinegar

Mix together all of the ingredients right in the spray bottle.  Use it just as you would any commercial window cleaner.

Wood Polish:
1 cup olive oil or almond oil
1/2 lemon juice
a few drops of essential oils are optional (I don't use them for this recipe because I find that the scent of the lemon or scent from the almond oil if I use it instead of olive oil is pretty enough)

Mix all ingredients in a spray bottle.  Spray onto a cleaning cloth and apply it to your furniture like you would commercial wood polish.


Carpet freshener: You could just sprinkle plain baking soda directly onto your carpets if you want a no frills carpet deoderizer but if you want something with a little more oopmf then try this recipe:
6 cups baking soda
3 cups dried lavender buds and flowers
1 cup cornstarch

Mix well and place inside an air tight plastic container.  Store for at least 2 days before using.  Sprinkle onto your carpet and let it sit for 45min-1 hour then vacuum it up.

Making your own cleaning products saves your money and your lungs.  
**A word to the wise if you want to make your own cleaners... Never mix vinegar or other acidic materials like ammonia with bleach. It WILL result in toxic fumes. So if you decide to go from here and experiment please do so safely and research.**


The above image can be found here.

Thrifty Thursday

I finished my 7x9 granny "rectangle" for Warm Up America.  

I used the rectangle granny square pattern found at crochet cabana.
For me, 8 rounds worked up to the exact dimensions I needed (7in x9in).
Easy Peasy Lemon Squeezy.


Onto the Thrifty Thursday money saving tip(s)...

I worked up a couple of really cute little chore charts for my oldest two kids.  I tailored made them for each of my kids according to their ages, reading skill level, etc.  I wanted them to be able to cross off each chore as they went through the day but having to print out multiple chore charts for the week or month seemed tedious and rather expensive in terms of paper and ink, not too mention wasteful.  The answer: laminating.   I could laminate a chore chart for each kid and hang it up in their room.  That way, they could use a washable marker or crayon and cross off each chore as they went through the day and the next morning we could wipe it clean and start all over again.  That's tip one.  Laminate your kids chore charts, or a template for your shopping list, or even a simple weekly planner.

With that idea in mind, I loaded up each of my little moppets and headed over to the local office supply store.  The laminators there ranged in price from $700 to $40.  I headed over to the local Walmart.   There the only choice of laminator cost $37.   I looked at the sheets of laminating paper.  The self sealing (no laminator needed) cost $10 for 20 sheets.   The ones that were meant to go through the laminator cost half that at around $5 for 20 sheets.  Now on to tip 2.
I didn't like the idea of paying nearly $40 for a laminator for simple home projects.  I really didn't like the idea of paying double for self sealing laminating sheets.  So, I came up with this thrifty little compromise.


I bought the sheets for the machine and decided to utilize my iron in lieu of the laminating press.
If you want to try this at home there are a couple of supplies that you will need.
1. An iron that has a low setting.
2. Thermal laminating sheets.
3. Tissue paper or light cloth to protect your iron.
4. Something to laminate (in this case I used an example of Middle's beautiful artwork monster)


Place your item into the laminating pouch like so...


Cover with the tissue paper.


For my iron I used the acetate/nylon setting.
If your iron doesn't have that option then just use the lowest setting if it gets too hot you'll have bumps and bunches and melted spots.


Press firmly as you iron.  I like to work from the top down and sweep out from the center as I go.
Make sure to get your corners and edges.
After about 10 seconds of work you have a nicely laminated product for a fraction of the cost.